Knit Inspiration from Tea Cups

Primary colored knitting swatch
Standard

Because I need a bit of inspiration now and again and I know many of you that follow me (knitters, crocheters, designers, and general makers) also like a bit of inspiration, I thought I’d start to post regularly about what’s inspiring me at the moment.

If you follow me on Instagram, you may have seen the start of a new swatch for a new design I’m conjuring up (above).

This design was inspired by a cup that my friend Carly painted at one of those paint-your-own-pottery.

Carly Williams Tea Cup

Carly’s Anthro-Inspired Teacup

She was inspired by this Anthropologie teacup:

Anthropologie Tea Cup

Such a cute teacup!


For some reason, the design of the teacup stuck in my head and last week I started charting out what I remembered it to look like in my head. After finding a picture of the teacup, I realized what I remembered was nothing like the teacup except for the primary colors.

It got me wondering what other teacup designs might make for cute colorwork patterns… and I put together this Pinterest board! I hope you find something that inspires your next project!

Finished Shirtie! (FO)

Completed Kelso sweater
Standard

Wow – I thought I’d never finish knitting this hooded, short-sleeved sweater!

I started knitting the Kelso sweater in May, so it took almost 6 months to complete. Now that I say that out loud, I’m surprised I knit my first sweater in less than a year.

Knitted Kelso sweater

Yeah, I’m using a remote control. What of it?

Knitting this was pretty fun. The lace panel in the middle uses the SAME pattern repeat every row (knit or purl), so it’s very easy to remember.

There is some seaming to do, which I was dreading because everyone talks about how awful seaming is, but I actually found it to be a bit fun to watch the mattress stitch zip up the sides of the sweater. I also learned how to do the kitchener stitch for the top of the hood!

I do wish that I’d knit a smaller size. I chose the 46″ size based on my bust size, adding 4″ for ease and it’s a bit swimmy in here. After reading Knit to Flatter and Knit Wear Love by Amy Herzog (the sweater queen, IMO), I now know that I should knit sweaters based on my upper torso size, adding darts where needed to increase sizing where things are a bit bigger. That would have meant making a 38″ instead of 46″ sweater.

The hoodie helps a lot to make this sweater look cute at a bigger size. Without it, it might just look like a big, frumpy shirt.

Sweater

Does this sweater make my bookshelves look big?

My only gripe with this pattern is that it called for 8 balls of yarn and I only needed 5.25 of them to finish the sweater at the size I chose. Maybe I knit weird but I swear I met gauge!

On to the yarn. I knit this using Knit Pick’s Palette. I absolutely LOVE the colors available in this yarn base. It’s 100% wool and 100% stinky when wet. Luckily the smell goes away after a bit, otherwise this sweater would be in the trash. I didn’t particularly love or hate knitting with the yarn, but it is a very nice match to this pattern.

Woohoo! Now I can cast on something else! Or perhaps I should finish that shawl… or sock.

Hooded shirt/sweater

Girl, look at that hoodie. I work out!

Cozy Knits & Crochet

Cozy Knits and Crochet Patterns
Standard

Here I sit, in my home in central Florida with the A/C blasting. It’s 88°F outside but I’m pretending there is a slight chill to the air. Drinking a pumpkin spice latte and scrolling through my Instagram feed, I see photo after photo celebrating the beginning of a new season—my favorite season—Autumn.

Autumn doesn’t seem to show up here until mid-November most years, so it is with much jealousy I have put together this set of cozy knitting and (one, sorry hookers) crochet patterns. They remind me of fireplaces, warm cups of hot cocoa, and colorful fallen leaves.

To those of you living a bit farther away from the equator than me, enjoy your chunky, cowled, and cabled sweaters! Put on those bulky, scrunchy socks and a matching pair of wrist  warmers, curl up in your coziest chair and get knitting (or hooking)!

A Blanket for Seriously Cold People

A Blanket for Seriously Cold People by Sylvia Bo Bilvia

Not sure you could get any cozier, wrapped in this chunky, ribbed blanket designed by Sylvia Bo Bilvia.

Perfect Autumn Sweaters

Top Left: Lanvad by Justyna Lorkowska Top Middle: Eddy by Amy Herzog Top Right: Cardiff Coat by Jennifer Wood Bottom Left: Coffee tunic by Mira Saarentaus Bottom Middle: Lila by Carrie Bostick Hoge Bottom Right: Frontiersman by Martin Storey

Cozy Accessories

Top Left: Hooded Cowl with Buttons by Melissa Grice (Crochet) Top Left Middle: Woodland Hoodlet by Tiny Owl Knits Top Left Bottom: Cosy gloves by Anna NikipirowiczTop Right: Cup of Cocoa Slouch Socks by Heather Walpole Bottom Left: Cosy Scarf by Marie Wallin Bottom Right: Slouchy Socks by Gwen Bortner

If you want to get even cozier, I have created the Get Cozy! bundle on Ravelry and will continue to add cozy, comfy knits and crochet projects to it.

Favorite the Get Cozy! bundle on Ravelry and maybe new patterns will pop up in your Pattern Highlights (is that how Ravelry works?).

Brooklyn Tweed’s Fall 2015 Lookbook

Willamette Scarf from the Brooklyn Tweed Lookbook
Standard

Brooklyn Tweed released their gorgeous Fall 2015 Lookbook today and it’s focused around one of my favorite things: The Pacific Northwest! Since they’ve moved their offices to Portland, I guess they’re feeling a bit inspired. I know the feeling.

The lookbook is beautiful and makes me want to pack up my needles and knit in Oregon somewhere.

Brooklyn Tweed's Quarry in Lazulite colorway

Brooklyn Tweed’s Quarry in Lazulite colorway

They have also released a new line of yarn: Quarry – a beautiful, bulky yarn that comes in the loveliest, earthy colorways! I’m a sucker for roving-style yarn and this one is sourced from Targhee-Columbia sheep in Wyoming, dyed in Philadelphia and spun in New Hampshire, keeping the process all in the US. It will definitely have a spot on my holiday wishlist!

30MinKnits Challenge

#30MinKnits Challenge
Standard

I’m challenging you all to knit for 30 minutes-a-day for 30 days!

Wait, why…?

I think many of us knitters, fast or slow, have gone through patches of knit-neglect. Our UFOs (unfinished objects) start piling up in a corner. We look back at the past few weeks and realize we haven’t knit at all or have only knit a couple of times and, with regret, we exclaim,

“If only I’d just knit for a few minutes every day, I’d be done with that project already!”

I want to gift myself with 30 minutes a day of knitting so I can…

  • Start and finish that second sock
  • Finish that beautiful red shawl I’ll never wear
  • Finish the shirtie I really want to wear
  • Finish the annual temperature scarf I started… in 2013

And I want you to gift 30 minutes to yourself as well! If you have unfinished knits or haven’t picked up your needles for a while, join me!

How the heck am I going to find 30 minutes?

  • If you’re a morning person, set your alarm for 30 minutes earlier than usual for 30 days, grab your cup of coffee (or tea!), settle in somewhere comfy and knit.
  • Knit between bites during lunch!
  • Knit at stoplights on your way to work. (Okay, that might be dangerous…)
  • Watching TV? Multitask and knit!
  • When you find yourself mindlessly surfing Facebook, Reddit, Ravelry, or anything else on the internet, put down your phone and pick up your needles.
  • Be mindful of your time – are you doing something you’ll regret not having done tomorrow? If not, knit!
  • Knit on the toilet…? (We’re heading into creepy territory.)
  • Knit in bed, right before you go to sleep because you almost forgot you were doing the 30MinKnits challenge!

Alright, I’m in. What are the rules?

Just a few… and I’m not going to be that picky. This challenge is a gift to you — you, the knitter, who wants to finish that UFO over there (and there, and there). Do what you can, when you can, but be nice to yourself and give yourself the time to do what you really want to do!

  • Work on whatever project you’d like for at least 30 minutes per day for 30 days in a row. That’s 30 minutes of actual knitting time, not Ravelry browsing or stash fondling to figure out what you want to knit.
  • When you want to, share your progress with everyone using the #30MinKnits hashtag on Instagram (or wherever you’d like).
  • Knit happy!

I’ll be starting this challenge on September 1st and I hope you’ll join me.

Making sense of variegated yarn

Making sense of variegated yarn
Standard

I have a problem.

Every time I walk into a yarn store I become enamored with hand-painted yarn. My pupils dilate, I grab a skein and cuddle it to my face, naming it Fluffy and promising to bring it home to be made into something amazingly beautiful.

I have done this many times… my yarn stash is full of skeins like this beauty:

Manos del Uruguay - Alegria

Manos del Uruguay, Alegria in Agave colorway

I bought this Manos del Uruguay skein while in Alaska (read about our Alaskan adventures on Off to Earth) because it reminded me of the aurora.

Whenever I get settled in at home after buying such a skein, I log into Ravelry and check out what’s been made with the yarn.

And I’m almost always disappointed.

Manos del Uruguay Alegria shawl

A pattern featuring the Manos del Uruguay Alegria yarn. I know some people love the way this coloring looks, but I can’t stand it. 

The way these beautiful skeins knit up into a barfy, disorganized mess makes me want to cry. In my head, I always imagine a finished knit that gradually fades from one color to another, like the skein, even though I know it won’t happen! What I’m really looking for is a gradient yarn, like these, but I keep buying variegated yarns instead.

If you’re like me, then perhaps you’ll find this Ravelry bundle of knitting patterns for variegated yarns to be helpful! I’ve found a few things seem to make variegated yarns look a bit more organized:

A small number of rows in the variegated yarn color separated by a solid color. The separation of color lets your eyes make sense of the color changes in small sections, giving a sense of organization. Each bubble in the sock below is kind of like a tiny window.

Sunnydayknitter's Stained Glass Bubble Socks

Sunnydayknitter’s Stained Glass Bubble Socks

Patterns to try for this effect:

Tall or dropped stitches. Taller stitches seem to give the colors some room to breath and the color changes don’t seem as abrupt. I didn’t see any examples, but I imagine treble stitch crochet would look pretty awesome as well.

Frazzledknitter's Drop Stitch Scarf

Frazzledknitter’s Drop Stitch Scarf

Patterns to try for this effect:

Linen stitch. The exact opposite of long/dropped stitches, the way colors mesh in a tight linen stitch seems more pleasing than stockinette / garter stitch.

Koigu Linen Stitch Scarf Pattern

Koigu Linen Stitch Scarf Pattern

Patterns to try for this effect:

Plan the pooling of your colors to create a pattern. I’ve thought about tackling the task of planned pooling for a while now. Planned pooling allows you to create a pattern using a variegated yarn using a bit of math. I’m not sure I’m totally up for all of the planning this entails since I usually like to wing it, but it’s definitely worth a try.

Color pooling on knit shawl

Really cool pooling occurring on this shawl made by Karla Stuebing

Learn about The Art and Science of Planned Pooling by Karla Stuebing.

Do you have any go-to patterns for variegated yarn?

Knitted: Doctor Who – Inspired Hat

INSULATE! Knitted Hat
Standard

After the train wreck that was my mug cozy, I felt like I needed to redeem myself as a knitter and I think I did, so I wanted to share this finished knitted object with you all.

I found the INSULATE! hat pattern by Amy van de Laar on Ravelry a few weeks ago when looking for something to knit with two skeins of yarn John bought for me. It’s a 2-color hat, covered in Daleks, and the pattern is free!

Luminous in the May Day colorway, by Sincere Sheep

Luminous in the May Day colorway, by Sincere Sheep

Polwarth Shimmer in the Plump colorway by Knitted Wit

Polwarth Shimmer in the Plump colorway by Knitted Wit

I wasn’t sure about knitting pink and purple Daleks, so I held off on knitting the hat, hoping to find a more appropriate use for the yarn. But the urgent need for a pick-me-up knit trumped my color concerns and I decided to cast-on earlier this week.

I loved working with these yarns. They are both 85% Polwarth wool and 15% silk. The wool makes the yarn squishy and the silk makes the yarn soft(er). They’re both hand-dyed and had slight variations in color. (And in case you’re wondering, which you’re probably not, fiber-enthusiasts care to know what kind of sheep their wool comes from, which is why it is known that this wool is from Polwarth sheep.)

Whovian in a knitted Dalek hat

Dalek hat and a Doctor Who reference on my shirt (not planned, but I have so many Whovian shirts, it was bound to happen)

Oh, how I love to knit a hat. They’re so quick to knit up and this one only had 3 ends to weave in when I was done — quick finishing FTW.

If you enjoy stranded colorwork, I’d definitely recommend this pattern. Amy (the designer) gives very clear instructions on how to knit the hat and how to knit it without needlessly wasting too much yarn. Rows with minimal color changes actually just use slipped stitches from the previous row so you don’t have to carry the other color around the back. Pretty snazzy!

In other knitting news, I started knitting a shirtie today (that’s a shirt and a hoodie). This is my first non-accessory garment that I will be knitting. I’m nervous but excited at the same time. Will keep you all posted!

Knitting Pattern: Nailed It! (NOT)

Standard

I’ve been working on a test knit for my mug cozy for probably a month, picking it up and putting it back down. The intarsia was a slow process, since I designed the color changes based on my own visual likes rather than ease of knitting. I’d also never done intarsia knitting before this.

Sheep in a field - gridded drawing

For your memory, this is the color pattern I was working from.

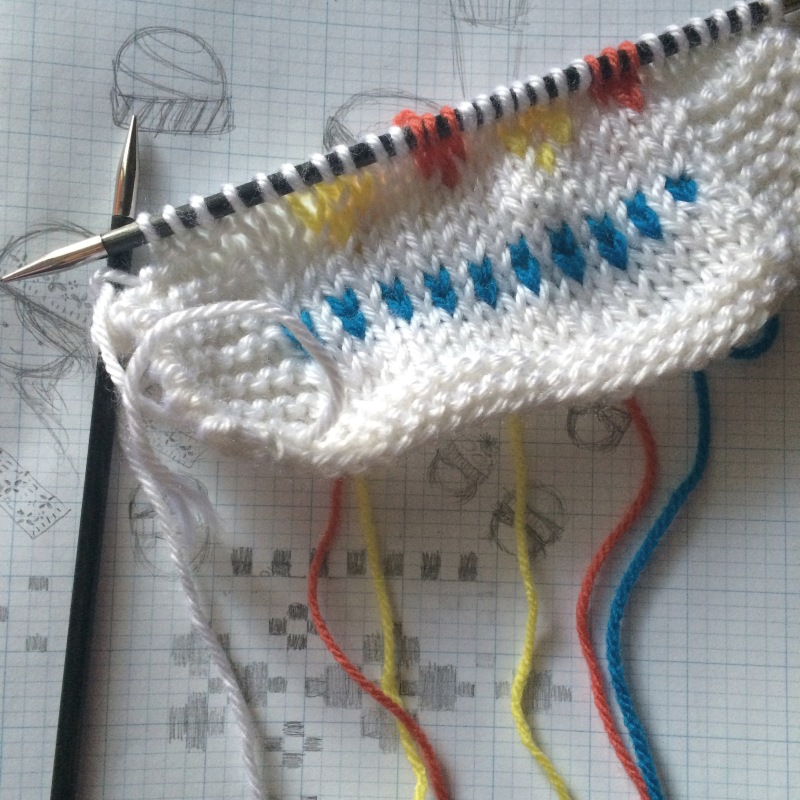
With intarsia, you create a new little bobbin of yarn to work from each time there is a color change. So, you’re knitting around in blue, get to a cloud, switch to a small bit of white, then switch to a new bit of blue (that’s right, you don’t just pick up the old blue you were using before until you come back around). Because you don’t bring the yarn along behind the work, every time there is a color change, you get a new bit of yarn. For every new bit of yarn, there is going to be an end to weave in.

Intarsia chart

For a visual representation: All of the stars in this section of the pattern show where a new bit of yarn is going to be used. The thicker black lines indicate a section where a bobbin of different yarn is used.

As I was designing this, I had no experience with intarsia, therefore, gave no thought to how many ****ing ends there would be to weave it when I finished the cozy.

Knitting - so many ends to weave in

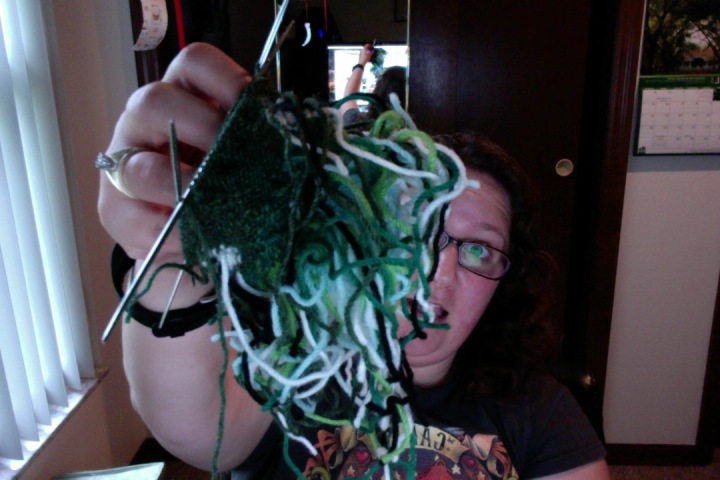
Attack of the spaghetti monster

I don’t even want to pretend I’m going to finish this test knit.

But either way, NAILED IT!

Crappy knitting

NAILED it! (NOT…)

Hahaha, just kidding. This poor mug cozy is a step away from being knitted vomit.

Aside from being a finishing nightmare, my technique was just not very good. The randomly loose stitches above would be fixed after I weaved in the ends of the yarn — they’re just loose because they’re not quite attached.

The blob thing that should be a sheep in a pasture though… wowwee.

I knit the clouds in seed stitch – k1, p1, then on the next row I’d purl the knits and knit the purls, creating these cute, fluffy clouds because purl stitches create a little horizontal bar that puffs out a bit.

The problem with purl stitches in colorwork is that the previous stitch is visible behind the purl bar. Not so noticeable when it’s white on light blue, but super noticeable when it’s white on dark green. I wanted the sheep to be fluffy, so I tried the same thing on them.

Colorwork gone wrong - knitting

Another example of how using purl stitches in colorwork can go horribly wrong, since I did purl the white stitches below the black stitches

Another issue I had was in using this technique to be able to knit in the round while still using the intarsia technique. I thought I did this correctly everytime I turned my work, but apparently not because the start/end section of the mug cozy looks quite… jacked. If you’re not a knitter, just notice how most sections have a straight line of Vs going down, but in the middle… who knows what’s happening? Also, you should become a knitter.

Bad knitting

Did I add stitches? I’m not sure, but that section looks totally wibbly-wobbly.

And my last gripe with this is that the green on the bottom needs more saturation. It’s being ousted on the next run.

So, it’s back to the drawing board with this pattern. Lessons learned:

  1. Practice the intarsia in the round technique way more, or just knit it flat and sew it into a cylinder when you’re done.
  2. Make sure your yarn colors are all equally saturated or it just looks sad.
  3. Don’t try to be cute with your fluffy purl stitches when doing high-contrast colorwork.
  4. It may not be worth the pain to create a color chart based solely on visual design — take the knitting experience into account and try to reduce the number of ends that will need to be weaved in at the end.

Read more about my adventure in creating my first knitting pattern:

Adventures in Intarsia-land (Or the Difference Between Intarsia and Stranded Knitting)

Standard

I’ve done a bit more research on the color knitting techniques I should try out for my mug cozy and I’ve come to the conclusion that I need to learn intarsia knitting.

Before today, intarsia and stranded knitting were all the same to me. Now I know better…

When using the stranded knitting technique, the floating yarn on the inside of my mug cozy was unruly and out of control. To try and fix this, I looked for tips on stranded knitting and found that I could secure the float every few stitches to keep the wrong side of the stranded knitting from looking like a bowl of spaghetti. In that Knitty article that I’d found a few days ago, I failed to notice the “when to use intarsia vs color stranding” section, which suggests that if you have a pattern with blocks of color that span more than 5 stitches, you’ll probably want to use intarsia. Which I do.

Today, as I started yet another Google search for more suggestions on yarn management in colored knitting, I kept seeing “intarsia” pop up. I figured I should at least see what the deal was and when I started learning how to do intarsia knitting (not just looking at end-results), I realized that although intarsia may not make knitting my mug cozy easier, it will probably make a better end product.

Differences Between Intarsia and Stranded Color Knitting

  1. The presence (stranded) and absence (intarsia) of floating yarn behind the work. This is a big deal for my mug cozy, which would be a huge pain in the butt to get onto a mug due to the floats inside the cozy.
  2. If you’re not switching back and forth between colors every few stitches, you’re going to waste yarn with stranded knitting. Intarsia is good for big blocks of color and vertical stripes because the yarn is carried a short distance  up to the next row behind the work.
  3. Setting up for intarsia looks like a lot of fun (not). For every color change or block of color in a pattern, you will want to create a mini ball of yarn that hangs behind your work. With stranded color knitting, you would typically knit from the same ball of yarn the entire time for all colors.
  4. Each color block in intarsia knitting will need to be weaved in when you’re done. Unless you’re not using a color for a long while, you probably won’t have much to weave in as a result of stranded knitting.

References and Helpful Tips for Beginning Intarsia Knitting

  1. The Woolly Brew has a very beginner’s guide in 10 tips for intarsia knitting. I loved this article because it gave me a fairly good overview of how to get started. It also made me dread making all of those little bobbins…
  2. For a visual guide, a video from KnittingHelp on intarsia. A comment on their site also alluded to the difficult nature of intarsia knitting in the round (which is how I’m knitting my mug cozy).
  3. A video on intarsia knitting in the round from Planet Purl, which shows that to do intarsia in the round, you’ll need to purl every other row (eeewwwww). I suppose that’s better than not being able to put the mug cozy on a mug.
  4. Introduction to intarsia from Twist Collective. The author gives some tips at the bottom of the article, such as adding in detail once the knitting is complete using embroidery or duplicate stitch.

After learning these things, I’m still a bit hesitant to use intarsia for my mug cozy. There are some sections of my pattern that seem like they will be obnoxious to set up and the thought of purling even though I’m knitting in the round is not appealing. But the amount of yarn I would waste in using stranded knitting for this, especially in the sheep section, makes the annoyance of intarsia seem pretty worth it.

I will keep you posted on how this intarsia adventure goes! If you have any tips, let me know!

A cute color chart: Tiny 8-Bit Sheep!

Standard
76x42 mosaic design

How peaceful… sheep in an 8-bit field

Just a quick update on my knitting pattern design adventure. Worked on this in Photoshop (I guess I gave up on hand-drawing) based on the test knit I was working on. This chart is 76 columns by 42 rows.

The color changes are still very spaced apart, so I will need to learn how to secure the floating yarn behind my work every few stitches. I’d rather figure out the techniques of knitting this rather than force my design into being more knit-friendly.

I’m excited to see how this looks in yarn. We’ll see how it goes…!

Read more about my adventure in creating my first knitting pattern: